Reflections In Perspective
Overview
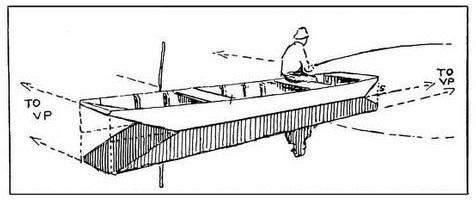
This tutorial will teach you how to draw reflections in perspective. Constructing a reflection in perspective can be challenging, especially for novices. Mirrors can obviously be positioned anywhere in perspective space and oriented at any angle relative to the viewer which makes for a potentially confusing projection process. So, to simplify matters, we’ve chosen to place a reflective surface directly below an existing perspective. By placing a mirrored surface directly below the objects already drawn in perspective, we’ve made the resulting reflection intuitively easy to understand and very simple to draw.
Sequence
Phase 1: Preparations
- Thoroughly familiarize yourself with these instructions before you begin. If there’s anything you don’t understand after reading these instructions, please feel free to ask for clarification at any time
- Gather up your supplies. You’ll be using many of the items listed on the Media Selection and Supplies page of this guide, so read over the list and take stock of your existing supplies. If you find anything missing in your inventory, take whatever steps are necessary to obtain the missing items as quickly as possible..
Phase 2: Planning
- You’ll be adding a reflection to an existing perspective; so search your records to find a recently completed one or two point perspective. By using an existing perspective, we can eliminate a great deal of preparatory work. For instance, you’ve already drawn the Horizon Line, located the Station Point and Picture Plane, located the Vanishing Points and established the relative heights of all the objects shown in perspective. The only thing left to do is add the upside down elevation and incorporate its height information into the perspective; so let’s proceed.
- Carefully examine the perspective you’ve chosen. As you look it over, make sure that the Plan, Elevation, Horizon Line, Picture Plane, Ground Line, Vanishing Points, and Station Point are all clearly visible. If not, find another perspective to work with.
- Check to see that the sheet of paper containing the existing elevation and perspective is large enough to accommodate a new elevation that will be positioned directly below the existing one and a reflection that will be positioned directly under the existing perspective.
- If your paper isn’t large enough, or doesn’t have enough unused or blank space, add an overlay to accommodate the new material.
- If you’re adding an overlay, draw a set of alignment marks so the base sheet and the overlay can be accurately reassembled.
Phase 3: Set Up
General
- As you begin each work session, adjust your chair, work-surface and light for ergonomic comfort.
- Tape your perspective to your drafting table or work-surface. If your perspective has overlays, make sure they’re properly aligned as you tape them down.
- Your task is to draw a mirror image directly below an existing perspective. To do that, you’ll be reusing the existing Plan, Elevation, Ground Line , Horizon Line, Station Point, Picture Plane, Vanishing Points, on the perspective you’ve chosen so don’t change or modify them in any way.
Setting Up the Elevation
- Draw an up-side down version of the existing elevation. Anchor the bottom of the upside-down elevation on the ground line directly below the existing right-side up elevation. Remember to use the same scale you used to create the original, right side up elevation.
- Number or label every key point on each object shown in your upside down elevation. Then, add the same labels to your Plan. These labels are the only changes you’ll be making to the plan.
- Check to ensure that both sets of labels have been accurately placed and well-coordinated. Make corrections as needed.
- You’re going to use the height information from the newly drawn upside down elevation to construct a true height line for the reflection; so draw horizontal construction lines from all the key points on the upside down elevation into perspective space.
Phase 4: Creating the Perspective
Review
Let’s revisit the steps you took to create your original perspective. First, you determined the relationship between the Observer and Object in Plan. Then you positioned the Picture Plane. Next, you determined the Observer’s eye height which established the location of the Horizon Line on your drawing. Then, you were able to determine where the vanishing point(s) landed on the Horizon Line. Then, after you brought over the object height information from the elevation, you were able to establish a true height line in perspective. Once the true height line was established, you were able to determine the location and shape of every surface in perspective by systematically projecting corner points back to a vanishing point.
Here’s a few things to keep in mind as you begin constructing your reflection:
- Almost all surfaces that you see in your existing perspective will have a reflection.
- Reflections are mirror images of real life objects. They always appear to be the same size as the originals. In other words, the upside down reflections you’ll be drawing will be the same size as the previously drawn “right side up” perspectives.
- Perspective reflections always share the same Vanishing Point(s) and Station Point as right side up twins since the relative position of the Observer to the Picture Plane hasn’t changed; nor has the distance from the Ground Line to the Horizon Line (i.e. The observer’s eye level hasn’t moved).
Construction
- Find the true height line in the existing perspective and extend it downward, well below the bottom of the existing perspective.
- Find the corresponding horizontal line coming from the upside down elevation and note where the horizontal and vertical lines meet. The resulting line will serve as the true height line for the reflection.
- Project lines back to vanishing point(s) from the top and bottom of the reflection’s true height line.
- Extend every vertical line in your original perspective downwards.
- Note where the lines going to the vanishing point(s) intersect the vertical lines coming from above. These intersections represent the corners of a flat plane who’s front edge is the reflection’s true height line. Darken in the outline of the enclosed plane.
- Repeat this process until every surface shown in the original perspective is also shown as a reflection. Work from the middle of the scene outwards toward both left and right edges connecting each new surface to one that’s been previously drawn.
Good Housekeeping
- At the end of each work session, gather up all your supplies and equipment and clean up your workplace. Find a safe place to store your work-in-progress as well as you supplies and equipment.
Phase 5: Finishing Touches
- Erase any unwanted construction lines.
- Add entourage to the completed perspective if desired.
- Scan your completed work. Then, edit the resulting digital image as needed.
- Archive your work in a safe place but keep it handy. You’ll probably want to use it in your portfolio.
- Post your work on your favorite social media website so others can see what you’ve accomplished.