Shadows in Perspective
Overview:
This tutorial will teach you how to draw shadows in perspective. You’ll note that the example we’ve chosen to use for this tutorial is a 2 point perspective; but the process we’re using also works equally well on 1 point perspectives. Shadows can be fairly difficult to construct in perspective. This is especially true if the objects casting the shadows have complex shapes, or are floating above the ground and are oriented irregularly to the ground or the observer. To explain how the process works, in as simple a manner as possible, we’ve elected to place a large box flat on the ground.
Sequence:
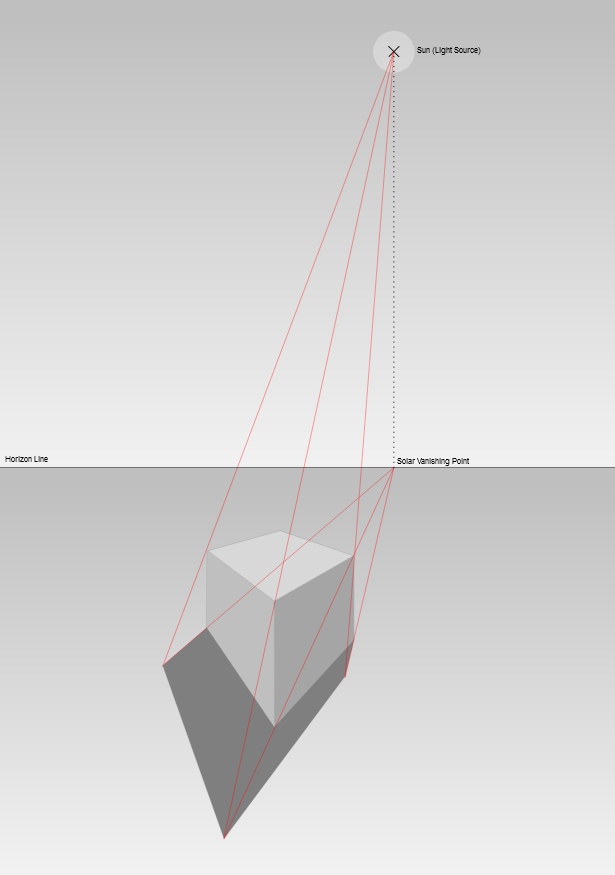
- Place the Sun (aka the “light source”) anywhere in your perspective above the horizon line and mark that spot with an “X”.
- Project a line vertically down from the center of the Sun (aka the Light Source) to the Horizon Line. Designate the resulting intersection as the Solar Vanishing Point (SVP).
- Draw construction lines from the Solar Vanishing Point through each corner on the bottom of the box. Be sure to extend these lines well beyond the corners.
- Draw construction lines from the center of the Sun to the top corners of the box. Be sure to extend every construction line well beyond each corner until they intersect the lines coming from the SVP. Designate each resulting intersection as a corner of the box’s shadow.
- Note where all of the intersections occur and draw lines connecting all of those intersections. The resulting enclosed area represents the shadow of the box.
- Fill in, shade or crosshatch the enclosed area.